Scenario Management
The "Scenario" tab allows you to manage all scenarios associated with an equipment. You can create, modify, delete and activate/deactivate your scenarios from this visual card interface.

Accessing the Scenario Tab
To access the scenario management of an equipment:
- Click on "Configure equipment" in the list of your equipment
- Then click on the "Scenario" tab
- Scenarios are displayed as cards organized in a grid.
Interface Overview
The interface consists of two main areas:
Header (top bar)
On the left: "Configured Scenarios"
On the right: Two action buttons
- 🔄 "Synchronize with equipment": Opens the synchronization modal
- Disabled if the equipment is not reachable
- ➕ "New scenario": Creates a new scenario
Card Area
When you have configured scenarios, they are displayed as a card grid.
Premium Feature
Scenarios are a feature available only with a Premium or Demo subscription.
If you don't have permissions, you will see:
- A lock message with icon 🔒
- A "Upgrade my subscription" button
- Existing scenario cards will be displayed in reduced opacity (read-only)
Scenario Cards
Each scenario is represented by a visual card containing all information and actions.
Card Structure
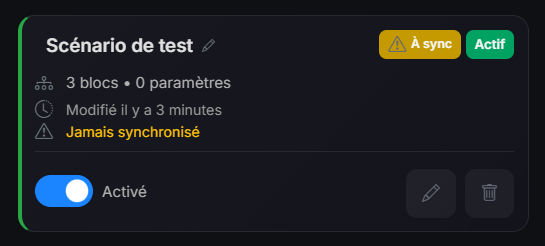
1. Card Header
Scenario name (clickable for editing):
- Click on the name to quickly edit the scenario name
Badges on the right:
- 🟡 "To sync" badge (orange): Displayed if the scenario needs to be synchronized
- Appears if never synchronized
- Appears if modified since last sync
- On hover: tooltip explaining the reason
- 🟢 "Active" badge (green) or 🔘 "Inactive" badge (gray)
2. Scenario Information
Three information lines:
Line 1: Composition
- Diagram icon
- "[X] blocks • [Y] parameters"
- Example: "5 blocks • 2 parameters"
Line 2: Last modification
- Clock icon
- "Modified [relative date]"
- Example: "Modified 2 hours ago"
- On hover: exact date in format "DD/MM/YYYY at HH:mm:ss"
Line 3: Synchronization status
- 🟢 If synchronized:
- Circular arrow icon
- "Synchronized [relative date]" in green
- Example: "Synchronized 10 minutes ago"
- 🟡 If never synchronized:
- Warning triangle icon
- "Never synchronized" in orange
4. Actions Section (card footer)
On the left: Activation/deactivation switch
- Label "Enabled" (if active) or "Disabled" (if inactive)
- Disabled during operation (spinner)
On the right: Action buttons
- 🖊️ Edit button (pencil icon, green on hover)
- Opens the canvas with the loaded scenario
- 🗑️ Delete button (trash icon, red on hover)
- Opens a confirmation modal
Creating a New Scenario
Method 1: "New scenario" Button
- Click on the "New scenario" button on the right
- The canvas opens directly in creation mode
Method 2: First Scenario
If you have no scenarios, an empty screen displays with:
- Message "No configured scenario"
- Button "Create my first scenario"
Choose clear and descriptive names for your scenarios. This will make managing them easier when you have several.
Editing a Scenario
Three ways to edit a scenario:
1. Via the Pencil Button on the Card
- Locate the scenario card
- Click on the button with pencil icon (green)
- The canvas opens with the loaded scenario
- Modify blocks, parameters, connections
- Save modifications (Ctrl+S or button)
2. Via the Scenario Name (quick edit)
To modify only the name:
- Click on the scenario name in the card
- A modal opens with a text field
- Modify the name
- Validate with Enter or the save button
- Cancel with Escape or the cancel button
Name editing is saved immediately, independently of the scenario content.
3. Double-click on the Card
You can also double-click anywhere on the card to open the canvas.
After modifying a scenario, don't forget to synchronize it with the equipment for changes to be applied! An orange "To sync" badge will appear automatically.
Deleting a Scenario
Deletion Process
- Locate the card of the scenario to delete
- Click on the trash button (red)
- A confirmation modal opens
Confirmation Modal
The modal displays:
- Trash icon in a transparent red circle
- Title: "Delete scenario"
- Message: "Are you sure you want to delete this scenario? This action is irreversible."
- Box with the name of the scenario to delete
- Two buttons:
- "Cancel" (gray) - Closes modal without deleting
- "Delete" (red) - Confirms deletion
During Deletion
- The button displays "Deleting..." with a spinner
- Buttons are disabled
- Deletion is executed server-side
⚠️ Deleting a scenario from the database is irreversible!
If you simply want to stop execution temporarily:
- ✅ Disable the scenario (switch)
- ❌ Don't delete it
What Happens After Deletion?
- ✅ The scenario is deleted from the database
- ❌ The scenario remains present in the equipment
- 🔄 It will appear as "orphan" during the next synchronization
- 🗑️ You can delete it from the equipment via the synchronization modal
Activating / Deactivating a Scenario
Activation and deactivation allow you to control scenario execution without deleting them.
Activation Switch
Each card has a toggle switch at the bottom left:
Activated state:
- Switch in right position (blue/green)
- Label "Enabled"
- Green "Active" badge at top
- Green left border
Deactivated state:
- Switch in left position (gray)
- Label "Disabled"
- Gray "Inactive" badge at top
- Gray left border
Toggling State
- Click on the switch or its label
- The state toggles instantly in the database
- The switch is disabled during operation (avoids double-clicks)
- An orange "To sync" badge appears automatically
- The scenario must be synchronized for the change to be applied to the equipment
The active/inactive state change is saved immediately in the database, but only takes effect on the equipment after synchronization.
The "To sync" badge reminds you that synchronization is necessary.
Benefits of Activation/Deactivation
This feature is very useful for:
- ✅ Testing a scenario before activating it permanently
- ✅ Temporarily disabling a seasonal scenario
- Example: Heating in summer, air conditioning in winter
- ✅ Debugging by isolating problematic scenarios
- ✅ Managing exceptional situations without losing configuration
- Example: Disable during construction work
- ✅ Saving memory on the equipment without losing the scenario
"To Sync" Badge
When Does it Appear?
The orange "To sync" badge with warning triangle icon appears automatically in two cases:
-
Never synchronized:
lastSyncAtis null- Tooltip: "This scenario has never been synchronized with the controller"
-
Modified since last sync:
updatedAt>lastSyncAt- Tooltip: "This scenario has been modified and must be synchronized with the controller"
What to Do When You See This Badge?
- Note scenarios with this badge
- Click on "Synchronize with equipment"
- In the modal, these scenarios will appear in "To update" or "Not synchronized" state
- Perform synchronization
- The badge disappears once synchronized
Synchronize your scenarios regularly to avoid accumulating too many unsynchronized modifications. This makes debugging easier in case of problems.
Date Information
Display Format
Dates use moment.js for user-friendly relative display:
- "a few seconds ago"
- "2 minutes ago"
- "1 hour ago"
- "3 days ago"
- "2 months ago"
On Hover (tooltip)
Hover over the date to see the exact format:
- Format: "DD/MM/YYYY at HH:mm:ss"
- Example: "10/20/2025 at 2:32:45 PM"
Color Codes
- 🔵 Gray: Modification date (neutral)
- 🟢 Green: Synchronization date (success)
- 🟡 Orange: "Never synchronized" (warning)
Design and User Experience
Visual Style
Cards use a modern design with:
- Dark background with glass effect (backdrop-filter)
- Subtle gradients for depth
- Translucent borders that become more visible on hover
- Fluid transition effects on all interactions
Responsive Design
The grid automatically adapts:
- Mobile (< 768px): 1 column
- Tablet (768-992px): 2 columns
- Desktop (992-1200px): 3 columns
- Large desktop (> 1200px): 4 columns
Animations
- Card hover: Slight elevation (-2px) and brightening
- Button hover: Enlargement (scale 1.05) and color change
- Transitions: 0.2s ease for all animations
Accessibility
- ✅ Informative tooltips on all interactive elements
- ✅ Pointer cursor on clickable elements
- ✅ Immediate visual feedback on actions
- ✅ Clearly identifiable disabled states
- ✅ Sufficient contrast for readability
Empty State (No Scenario)
When no scenario exists, the interface displays:
- Large icon diagram (bi-diagram-3) in gray
- Title: "No configured scenario"
- Message: "Create your first scenario to automate your equipment."
- CTA button: "Create my first scenario" with + icon
This is the ideal time to start! Click the button and create your first automation scenario. You can start simple and gradually add complexity.
Shortcuts and Tips
Keyboard Shortcuts
When a name edit modal is open:
- Enter: Validate and save
- Escape: Cancel and close
Quick Interactions
- Click on name: Quickly edit the name
- Click on pencil: Open full canvas
- Click on switch: Toggle active/inactive
- Double-click on card: Open canvas
Quick Visual Indicators
- Green border = Active
- Gray border = Inactive
- Orange badge = To synchronize
- Orange text = Never synchronized
- Green text = Last sync
Best Practices
For efficient scenario management:
✅ Name clearly: Use descriptive and explicit names ✅ Add descriptions: Document complex scenarios ✅ Synchronize regularly: Don't let "To sync" badges accumulate ✅ Disable rather than delete: For temporary scenarios ✅ Organize by function: Mentally group scenarios by zone or function ✅ Test after modification: Check behavior after each change ✅ Monitor badges: Visual indicators guide you ✅ Clean regularly: Delete truly obsolete scenarios
Limitations and Considerations
Permissions
- ❌ Without Premium/Demo subscription: Read-only (50% opacity)
- ✅ With subscription: All features available
Performance
- The grid loads all scenarios at once (no pagination currently)
- Recommended: Keep a reasonable number of scenarios (< 50) for optimal performance
Synchronization
- Modifications are saved to database immediately
- But only take effect on equipment after synchronization
- Always remember to synchronize after your modifications
Next Step
Now that you know how to manage your scenarios, discover how to create and modify them in the creation interface: Creation Interface (Canvas)